Exam RVT_ELEC_01101 Exercise & Reliable RVT_ELEC_01101 Test Testking
Wiki Article
P.S. Free 2026 Autodesk RVT_ELEC_01101 dumps are available on Google Drive shared by PassLeaderVCE: https://drive.google.com/open?id=1_dFOUFSTz-MWkb4K1IGTPsVNHZU4YCZE
we believe that all students who have purchased RVT_ELEC_01101 practice materials will be able to successfully pass the professional RVT_ELEC_01101 qualification exam as long as they follow the content provided by our RVT_ELEC_01101 study materials, study it on a daily basis, and conduct regular self-examination through mock exams. Of course, before you buy, our RVT_ELEC_01101 Study Materials offer you a free trial service, as long as you log on our website, you can download our trial questions bank for free. I believe that after you try RVT_ELEC_01101 test engine, you will love them.
Autodesk RVT_ELEC_01101 Exam copyright Topics:
| Topic | Details |
|---|---|
| Topic 1 |
|
| Topic 2 |
|
| Topic 3 |
|
| Topic 4 |
|
| Topic 5 |
|
>> Exam RVT_ELEC_01101 Exercise <<
Reliable RVT_ELEC_01101 Test Testking - RVT_ELEC_01101 Training For Exam
Our RVT_ELEC_01101 learning materials help you to easily acquire the RVT_ELEC_01101 certification even if you have never touched the relative knowledge before. With our RVT_ELEC_01101 exam questions, you will easily get the favor of executives and successfully enter the gates of famous companies. You will have higher wages and a better development platform. What are you waiting for? Come and buy RVT_ELEC_01101 Study Guide now!
Autodesk Certified Professional in Revit for Electrical Design Sample Questions (Q42-Q47):
NEW QUESTION # 42
Refer to exhibits.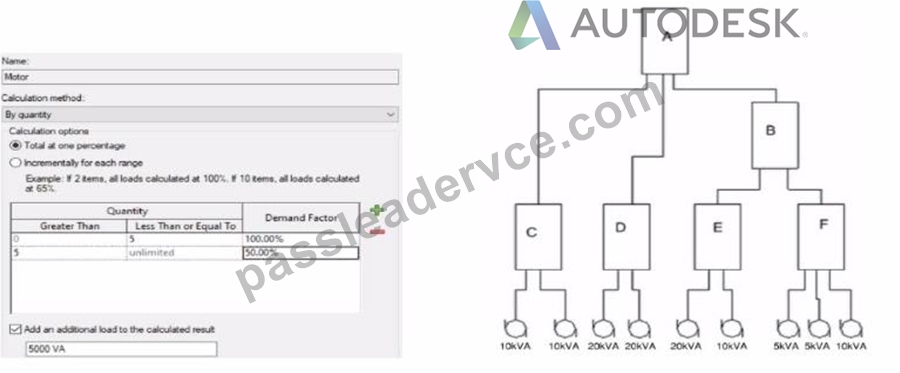
What is the demand load on Panel B?
- A. 65kVA
- B. 55kVA
- C. 40kVA
- D. 30kVA
Answer: B
Explanation:
In Revit Electrical, Demand Factors are applied through Load Classifications to compute an Estimated Demand Load rather than simply summing connected loads. The documentation states: "You use demand factors to adjust the rating of the main service... Demand factors are assigned to load classifications, and load classifications are assigned to device connectors. The estimated load for a device is calculated by multiplying the load by the demand factor. ... The panel schedule can also display the load for each load classification." In the exhibit's Demand Factor definition (for the Motor classification), the Calculation method is By quantity with Total at one percentage selected. Two quantity ranges are defined: 0-5 items at 100% and 5-unlimited at 50%. An additional checkbox adds an extra fixed load of 5000 VA to the calculated result. (This follows Revit's behavior of applying the selected demand factor to the connected load and then adding any specified additional load to the result for that classification.) Panel B feeds only panels E and F. The connected motor loads downstream are:
Panel E: 20 kVA + 10 kVA = 30 kVA
Panel F: 5 kVA + 5 kVA + 10 kVA = 20 kVA
Total connected motor load on B = 30 + 20 = 50 kVA (five items).
Because five items fall in the 0-5 range at 100%, the demand factor is 100% → 50 kVA. Per the definition, add an additional load of 5000 VA (5 kVA) to the calculated result:
Demand Load on Panel B = 50 kVA × 100% + 5 kVA = 55 kVA.
Therefore, the correct choice is 55 kVA.
References: Revit MEP Electrical documentation - Demand Factors (assignment to load classifications, multiplication to compute estimated load, and display in panel schedules).
NEW QUESTION # 43
An electrical designer Is working on a workshared model.
Which two worksharing display settings can the designer use to visualize model elements that have no ownership? (Select two.)
- A. Checkout Status
- B. Owners
- C. Worksets
- D. Gray Inactive Worksets
- E. Model Updates
Answer: A,B
Explanation:
When working in a workshared Revit model, elements without ownership can be visually identified using Worksharing Display Settings.
As per Revit MEP Worksharing Guide - Worksharing Display Modes section:
"Worksharing display modes include options such as Checkout Status, Owners, and Worksets.
The Checkout Status mode shows elements that are not owned or are available for editing.
The Owners mode highlights elements based on who owns them, allowing unowned elements to appear as 'none.'" Therefore:
✅ B. Checkout Status - shows elements that are editable or not owned.
✅ E. Owners - displays which elements are owned and highlights those without ownership.
Incorrect options:
A . Worksets: Shows which workset an element belongs to, not ownership.
C . Gray Inactive Worksets: Only grays out inactive worksets.
D . Model Updates: Not a valid worksharing display setting.
NEW QUESTION # 44
What two ways can an electrical designer copy a cable tray type from a project to a template? (Select two.)
- A. 1 Open both the project and the template in the same Revit session.
2. In the template, activate Transfer Project Standards.
3. Choose to copy from the project and then select Cable Tray Types. - B. 1. Open the project and the template in separate Revit sessions.
2. In the template, activate Transfer Project Standards.
3. Choose to copy from the project and then select Cable Tray Types. - C. 1. Open both the project and the template in the same Revit session.
2. In the project, select the cable tray and click Edit Family.
3. Click Load into Project and select the template to load the family into. - D. 1. Open both the project and the template in the same Revit session.
2. In the project, copy the cable tray to the clipboard.
3. Switch to the template and paste the cable tray in a view. - E. 1. Open the project and the template In separate Revit sessions.
2. In the project, copy the cable tray to the clipboard.
3. Switch to the template and paste the cable tray in a view.
Answer: A,D
Explanation:
In Autodesk Revit for Electrical Design, there are two correct and officially supported methods to transfer or copy Cable Tray Types (including sizes, materials, and type properties) from an existing project into a template file (.rte). These methods ensure that all type definitions, fittings, and related MEP settings are preserved.
✅ Option B (Clipboard Copy within the same Revit session)
1. Open both the project and the template in the same Revit session.
2. In the project, copy the cable tray to the clipboard.
3. Switch to the template and paste the cable tray in a view.
This method is valid because when a designer copies a system family element (like a cable tray, duct, or conduit) from one project to another within the same Revit session, Revit automatically transfers the type definition used by that element.
According to the Revit MEP User's Guide, Chapter 17 - Electrical Systems:
"Copying a cable tray from one project to another carries its type properties with it, including size, material, and fittings, as Revit automatically loads the associated system family definition." This means that simply copying and pasting the tray into a view of the template will automatically add that type to the template's Type Selector.
✅ Option C (Transfer Project Standards)
1. Open both the project and the template in the same Revit session.
2. In the template, activate Transfer Project Standards.
3. Choose to copy from the project and then select Cable Tray Types.
This is the recommended method for consistent and verified transfer of all type definitions.
From the same guide under Panel Schedule Templates and System Types Management:
"Use Transfer Project Standards to copy system family types, such as Cable Tray Types, Conduit Types, and related MEP settings, between projects or into templates." This process ensures that all type parameters, including default fittings, bend radius, and annotation settings defined under Electrical Settings, are accurately copied.
References:
Autodesk Revit MEP User's Guide - Chapter 17 "Electrical Systems," pp. 407-409 (Cable Tray Management and Transfer Standards) Autodesk Revit MEP 2011 What's New - Section "Copy Styles Using Transfer Project Standards" Smithsonian Facilities Revit Template User's Guide - "Transferring MEP Types into Templates," pp. 68-71
NEW QUESTION # 45
Refer to exhibit.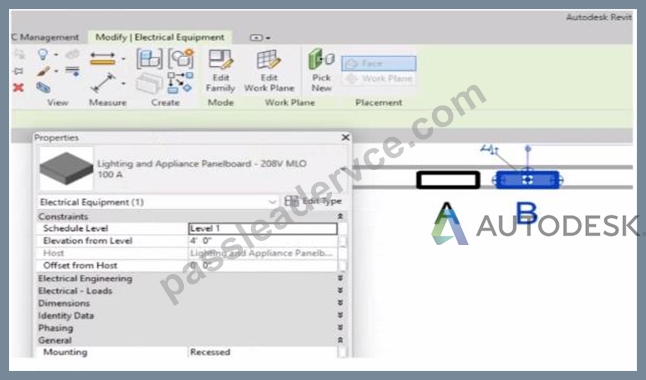
An electrical designer has accidentally hosted Panel B to Panel A. Select two ways the designer can correct hosting. (Select two.)
- A. Edit the Host value in the Properties palette.
- B. Use the Edit Work Plane command
- C. Use the Move command.
- D. Edit the Mounting value in the Properties palette.
- E. Use the Pick New command in the Work Plane panel.
Answer: B,E
Explanation:
In Autodesk Revit's Electrical discipline, when electrical components such as panelboards are hosted incorrectly (for example, Panel B hosted to Panel A instead of a wall or level), the hosting relationship must be corrected by reassigning the work plane or host. This is essential because hosted electrical elements depend on the geometry or level of their host for placement, alignment, and coordination.
According to the Revit MEP User's Guide (Chapter 45 "Work Planes and Element Hosting"):
"If a hosted element is placed incorrectly or the host has changed, use the Edit Work Plane or Pick New commands to redefine its host or work plane." Here's how these two tools apply:
Pick New (Option A)
Located under the Work Plane panel on the Modify tab, this command allows you to select a new face or host (e.g., a wall, ceiling, or floor) for the existing component. It effectively reassigns the element's host without deleting or recreating the element.
"Use Pick New to specify a different face or surface as the host for a component that was incorrectly placed."
Edit Work Plane (Option E)
This command lets the designer redefine the reference level or named work plane to which an element is associated. For hosted electrical equipment (like lighting or panels), this ensures the object references the correct structural or architectural surface.
"To correct hosting errors, open Edit Work Plane from the Modify tab, and assign a new named plane, level, or face." Incorrect Options Explanation:
B . Edit Mounting value - changes only how the panel is mounted (e.g., recessed or surface), not the host itself.
C . Move command - repositions the element but does not change the hosting relationship.
D . Edit Host value - the "Host" parameter is read-only; it cannot be edited directly.
Thus, the correct methods to rehost Panel B from Panel A to the correct wall or work plane are through Pick New and Edit Work Plane, ensuring proper association and maintaining system connectivity.
References:
Autodesk Revit MEP User's Guide - Chapter 45 "Work Planes and Hosting," pp. 1068-1072 Smithsonian Facilities Revit Template User's Guide - Section 6.2.3 "Complex Geometry and Multiple Parametric Relationships," p. 57 Autodesk Revit Electrical Design Essentials - "Rehosting Electrical Equipment and Devices"
NEW QUESTION # 46
An electrical designer wants to schedule parameters from generic annotations Which type of schedule must be created?
- A. A Generic Family schedule
- B. D. A Sheet List
- C. A Generic Annotation schedule
- D. A Note Block
Answer: D
Explanation:
When an electrical designer wants to schedule parameters from Generic Annotations, the correct method is to use a Note Block, not a generic schedule. Revit documentation defines this process clearly under Annotation Schedules (Note Blocks):
"Annotation schedules, or note blocks, list all instances of annotations that you can add using the Symbol tool."
"Creating an Annotation Schedule (Note Block):
Load the generic annotation family or families into your project and place them where desired.
Click View tab ➤ Create panel ➤ Schedules drop-down ➤ Note Block.
In the New Note Block dialog, for Family, select a generic annotation." This extract confirms that when working with generic annotation families, Revit requires the use of a Note Block to extract and list their parameters in a schedule. Standard schedules such as Generic Model or Family schedules cannot access data from Generic Annotations since they are annotation-based, not model-based.
NEW QUESTION # 47
......
A Autodesk Certified Professional in Revit for Electrical Design (RVT_ELEC_01101) practice questions is a helpful, proven strategy to crack the Autodesk Certified Professional in Revit for Electrical Design (RVT_ELEC_01101) exam successfully. It helps candidates to know their weaknesses and overall performance. PassLeaderVCE software has hundreds of Autodesk Certified Professional in Revit for Electrical Design (RVT_ELEC_01101) exam dumps that are useful to practice in real-time.
Reliable RVT_ELEC_01101 Test Testking: https://www.passleadervce.com/Autodesk-Certified-Professional/reliable-RVT_ELEC_01101-exam-learning-guide.html
- RVT_ELEC_01101 Exam Actual Tests ???? Exam RVT_ELEC_01101 Simulator Free ???? RVT_ELEC_01101 Test Vce ???? Open ⏩ www.prepawaypdf.com ⏪ enter ➤ RVT_ELEC_01101 ⮘ and obtain a free download ????RVT_ELEC_01101 Exam Actual Tests
- Premium RVT_ELEC_01101 Exam ???? RVT_ELEC_01101 Latest Test Sample ???? RVT_ELEC_01101 Real Exam ???? Search for ➠ RVT_ELEC_01101 ???? and obtain a free download on ➥ www.pdfvce.com ???? ????Premium RVT_ELEC_01101 Exam
- Sure RVT_ELEC_01101 Pass ???? Exam RVT_ELEC_01101 Forum ???? RVT_ELEC_01101 Reliable copyright ???? Easily obtain free download of ▛ RVT_ELEC_01101 ▟ by searching on ⮆ www.testkingpass.com ⮄ ????RVT_ELEC_01101 Exam Actual Tests
- RVT_ELEC_01101 Latest Exam Cram ???? RVT_ELEC_01101 Exam Actual Tests ???? Premium RVT_ELEC_01101 Exam ???? Search for ☀ RVT_ELEC_01101 ️☀️ and download it for free immediately on ⮆ www.pdfvce.com ⮄ ????RVT_ELEC_01101 Latest Version
- Valid RVT_ELEC_01101 Test Online ???? Latest RVT_ELEC_01101 Test Pdf ???? Real RVT_ELEC_01101 Exam Dumps ???? Open 《 www.prep4sures.top 》 enter 【 RVT_ELEC_01101 】 and obtain a free download ????RVT_ELEC_01101 Reliable copyright
- Pdfvce RVT_ELEC_01101 PDF Questions and Practice Test Software ???? Search for ➽ RVT_ELEC_01101 ???? and obtain a free download on ⮆ www.pdfvce.com ⮄ ????RVT_ELEC_01101 Reliable copyright
- RVT_ELEC_01101 Latest Exam Cram ⏪ Exam RVT_ELEC_01101 Simulator Free ???? RVT_ELEC_01101 Exam Actual Tests ???? Search on ▛ www.examcollectionpass.com ▟ for “ RVT_ELEC_01101 ” to obtain exam materials for free download ????RVT_ELEC_01101 Latest Exam Cram
- Sure RVT_ELEC_01101 Pass ???? Downloadable RVT_ELEC_01101 PDF ???? RVT_ELEC_01101 Exam Actual Tests ???? Search for ➤ RVT_ELEC_01101 ⮘ and easily obtain a free download on ➤ www.pdfvce.com ⮘ ????RVT_ELEC_01101 Reliable copyright
- RVT_ELEC_01101 Latest Version ♻ Downloadable RVT_ELEC_01101 PDF ???? Reliable RVT_ELEC_01101 Exam Sims ???? Enter [ www.verifieddumps.com ] and search for ⏩ RVT_ELEC_01101 ⏪ to download for free ????RVT_ELEC_01101 Latest Exam Cram
- Real RVT_ELEC_01101 Exam Dumps ???? Sure RVT_ELEC_01101 Pass ???? RVT_ELEC_01101 Real Exam ???? Enter ▷ www.pdfvce.com ◁ and search for ⏩ RVT_ELEC_01101 ⏪ to download for free ????Exam RVT_ELEC_01101 Simulator Free
- Exam RVT_ELEC_01101 Exercise - 100% Unparalleled Questions Pool ???? ➤ www.vceengine.com ⮘ is best website to obtain ➡ RVT_ELEC_01101 ️⬅️ for free download ❣RVT_ELEC_01101 Latest Exam Cram
- tedbnxm409219.livebloggs.com, carlyrzpg430927.blogaritma.com, myportal.utt.edu.tt, myportal.utt.edu.tt, myportal.utt.edu.tt, myportal.utt.edu.tt, myportal.utt.edu.tt, myportal.utt.edu.tt, tamzinnyjb427041.plpwiki.com, lilycocg097922.blogoxo.com, telebookmarks.com, myportal.utt.edu.tt, myportal.utt.edu.tt, myportal.utt.edu.tt, myportal.utt.edu.tt, myportal.utt.edu.tt, myportal.utt.edu.tt, myportal.utt.edu.tt, myportal.utt.edu.tt, myportal.utt.edu.tt, myportal.utt.edu.tt, bookmarksden.com, nybookmark.com, jonasrcuj894944.blog2freedom.com, Disposable vapes
What's more, part of that PassLeaderVCE RVT_ELEC_01101 dumps now are free: https://drive.google.com/open?id=1_dFOUFSTz-MWkb4K1IGTPsVNHZU4YCZE
Report this wiki page